


Jonathon Price – Violinmaker
Jonathon Price is a violinmaker from Detroit, Michigan and has many of his instruments in the hands of world renowned musicians. We welcome him here, writing our first guest article about assessing the setup, condition of the fingerboard, and string heights on violin family instruments. Check out Jonathon’s website at http://www.jonathonpriceviolins.com to learn more about him and his handmade heirloom quality instruments.
Fingerboard Condition
The condition of the fingerboard plays a major role in the ease of play and even intonation on bowed string instruments. The proper height of the strings at the nut and bridge, coupled with the condition and scoop of the fingerboard, work together to allow the instrument to have a clear tone with ease for the left hand facilities. If the fingerboard has no scoop or ruts in it from excessive wear, there may be some buzzing when the instrument is bowed too heavily and it may be difficult to get that one note perfectly in tune. Though there are a number of things an instrument technician checks over, the following is a basic look at some of those considerations and measurements.
Checklist
A simple checklist for briefly assessing the setup on an instrument might go as follows:
- Sight down the fingerboard
- Hold down the strings at both ends of the fingerboard to judge the scoop in the fingerboard
- Feel how hard it is to press the strings down in the first few positions
- Then measure the string height at the nut and end of the fingerboard.
Sight Down the Fingerboard
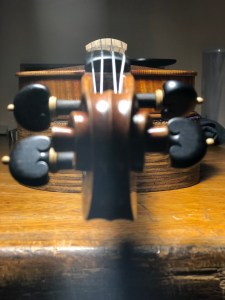
Whether shopping for an instrument or checking over an instrument for a student, when assessing the setup, one of the first things to do is to sight down the fingerboard. With one eye closed, line up the end of the fingerboard with the nut to see how high the bridge stands, to judge the bridge height, curve, and string spacing. The bass side of the bridge should not be wildly higher than the treble side. If that is the case, it’s either compensating for some issue with the neck geometry or it’s just plain wrong. At this time a judgment of the fingerboard can be made. With the light at a good angle, tilt the instrument back and forth and side to side, any bumps and imperfections in the fingerboard will become apparent. If the wear is excessive, it most likely needs to have the fingerboard planed true. In the hands of a qualified technician, this procedure is basic maintenance.
Fingerboard Scoop
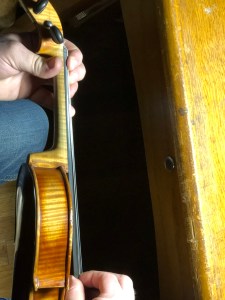
Fingerboard scoop refers to the hollow along its length from the end of the nut to the bridge. We can get a visual estimate of this by pushing the string down at the half position while simultaneously pushing the string to touch the fingerboard at the bridge end. This essentially uses the string to create a straight edge. Looking at the middle of the fingerboard, there should be some space. Typically there should be more scoop for a lower bridge and nut and less scoop for a higher bridge and nut. On a violin, it can be as little as .25mm and up to .75mm under the E string and between 1.5mm to 2.5mm under the G string. A general guide is that the scoop should be half the diameter of the string in the middle. This concept is the same for viola, cello, and bass, but to a greater degree because of the thickness of the string, the overall string length, and lower tuning.
Nut Height
While holding the string down at the half position by the nut, we can get a feel for the nut height as well. If it is too high, it can really be felt foremost and then can be gauged by eye. The space between the string and the fingerboard by the nut can be as little as .25mm. Sometimes even less depending on the fingerboard scoop and bridge height.
A feeler gauge can be used to measure the height. A homemade feeler gauge can be fashioned from a thin piece of wood such a popsicle stick and filed and/or planned down to thickness.
After inspecting a handful of instruments, one can start to trust their eyes and the feel of the strings under their fingers quicker than taking measurement at the end of the fingerboard. Measurements can always be taken afterward, just to confirm what is seen and felt.
Basic Measurements
Special considerations should be made if position tapes are being used on student instruments, however the following are the basic ranges for the instruments when measuring the string height at the end of the fingerboard.
- Violin 3mm – 4mm under the E String and 4.5mm – 5.5mm under the G string
- Viola 4.5mm – 5.5mm under the A string and 5mm – 6mm under the C string
- Cello 5mm – 6.5mm under the A string and 5.5mm – 7.5mm under the C string

One Reply to “”